

Connect Godaddy Domain to Hostinger with Nameservers or A Records Method
Table of Contents
Welcome to Your Next Big Step!
Hey there! 👋 Whether you’ve just purchased a domain from GoDaddy for your personal portfolio, side hustle, startup website, or even a passion project — you’ve already taken an exciting step toward building your online presence. Maybe you grabbed that domain because of a sweet offer, great value, or just because it felt like the perfect name for your brand or creative space. Whatever the reason, you’re in the right place!
Now, if you’re hosting your site on Hostinger using a temporary domain, you’re probably wondering how to link it up with your GoDaddy domain and make everything look and feel professional. Trust me, you’re not alone. Many of us start this way — purchasing domains from trusted providers like GoDaddy and pairing them with web hosting from platforms like Hostinger for affordability, ease, and flexibility.
This guide is here to walk you through the process step by step, ensuring you enjoy a seamless experience connecting your domain to your website. By the end, you’ll have your site up and running with your own custom URL — ready to impress clients, friends, or the world at large.
Let’s dive in and turn that temporary setup into a fully branded online home you’ll be proud to share!

Methods of Connecting Godaddy Domain to Hostinger
Now that you’re ready to link your GoDaddy domain with your Hostinger website, it’s important to know that there are two main methods to make this happen — each with its own benefits depending on what you’re aiming for:
- Nameservers Method
- A Records Method
Choose menthod according to your requirement
Hostinger recommends using the Nameservers method, especially if you want a quick, hassle-free setup. It’s perfect for those who prefer simplicity and don’t want to manually configure things like emails, subdomains, or verification records every time you make changes. Once you point your domain’s nameservers to Hostinger, everything — from emails to custom settings — is managed smoothly from one place.
On the other hand, the A records method is also a great option, particularly if you’re aiming for long-term control and customization. This method allows you to keep full command over your domain’s settings, letting you configure advanced options whenever you want. If you’re a tech enthusiast, or simply enjoy understanding how things work under the hood, this might be the method for you!
Both options are valid, and choosing the right one depends on your goals, experience, and how much control you want over your site’s setup.
Next, we’ll dive into each method so you can pick what’s best for you and get your website running seamlessly!
Method 1: Changing Domain Nameservers
Follow these steps to update your nameservers:
- Visit the GoDaddy website and log in to the account where you purchased the domain.
- Once you’re successfully logged in, go to the Profile section located at the top right corner of the page. You’ll see a circle with the initials of your name or business name — click on it.
- From the dropdown options, click on My Products. Your page will refresh and display your account’s products.
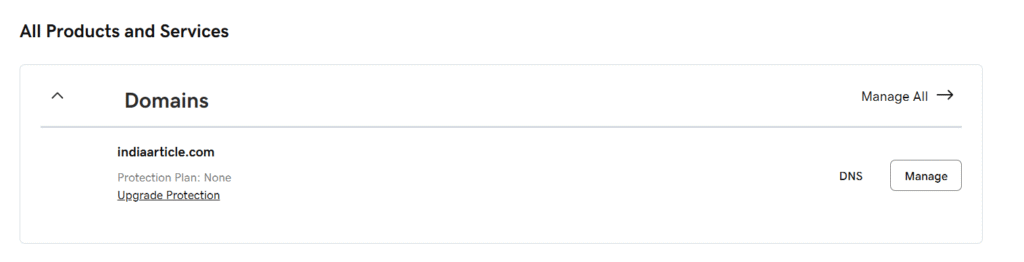
- Scroll down until you find the All Products and Services section. Locate the domain you want to connect and click on DNS next to it.
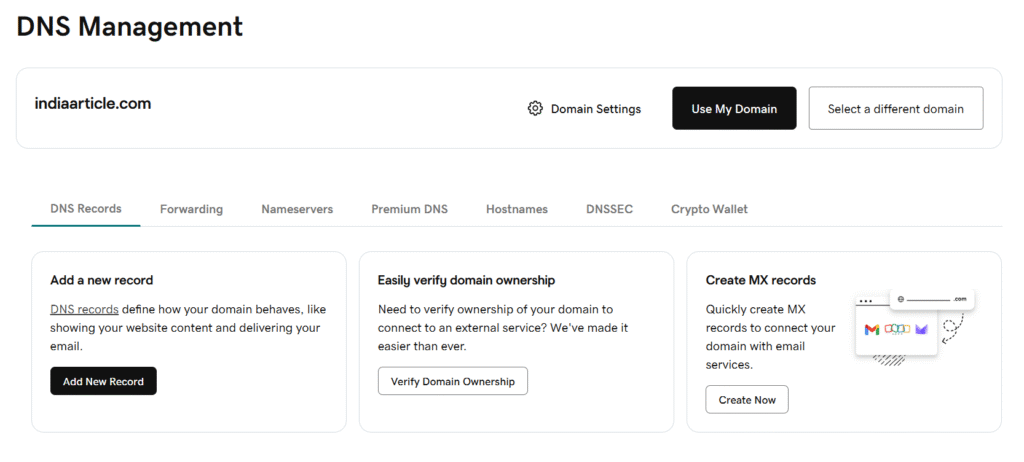
- You’ll be redirected to the DNS Management page. Here, you’ll see several options like DNS Records, Forwarding, and Nameservers.
- Click on Nameservers. You’ll see that you’re currently using the default GoDaddy nameservers.
- Now, click on Change Nameservers and select I’ll use my own nameservers.
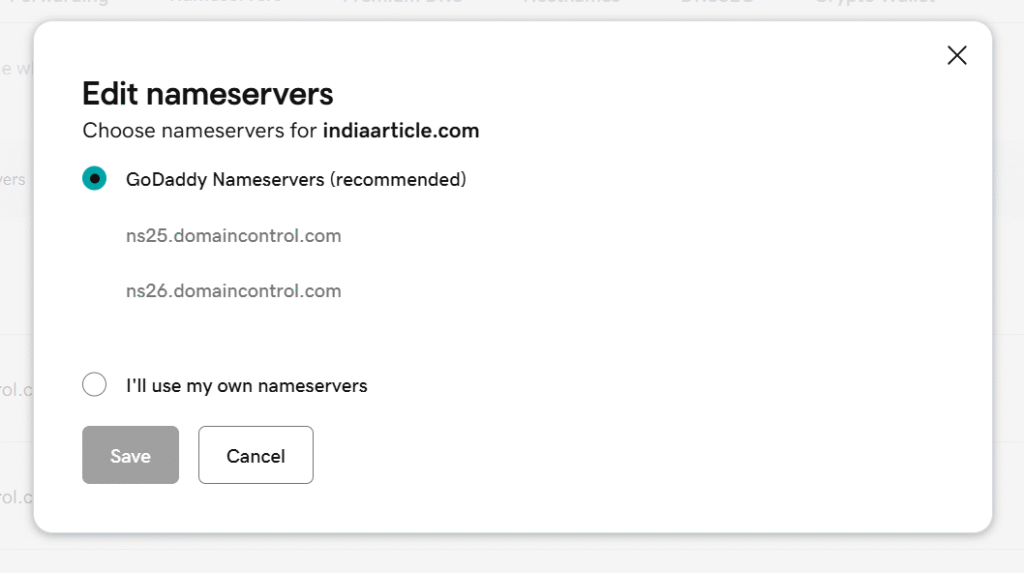
- Copy and paste the following Hostinger nameservers into the provided fields:
ns1.dns-parking.comns2.dns-parking.com
- After pasting the new nameservers, confirm the changes. You’ll need to verify this by entering an OTP sent to your registered email.
Important Notes:
It can take up to 24 hours for DNS changes to fully propagate worldwide, though in many cases it happens much faster.
Alternatively, you can edit the nameservers via the dedicated nameservers section if that’s available in your account settings.
With this method, once the changes are verified, Hostinger will take care of the rest — making your website setup smoother and easier to manage.
Method 2: Changing A Records
Let’s walk through the process together!
Step 1 – Find Your Website’s IP Address
- Log in to your Hostinger account and go to hPanel.
- Navigate to Website > Website List.
- Find the website you want to connect, then click the Dashboard button next to it.
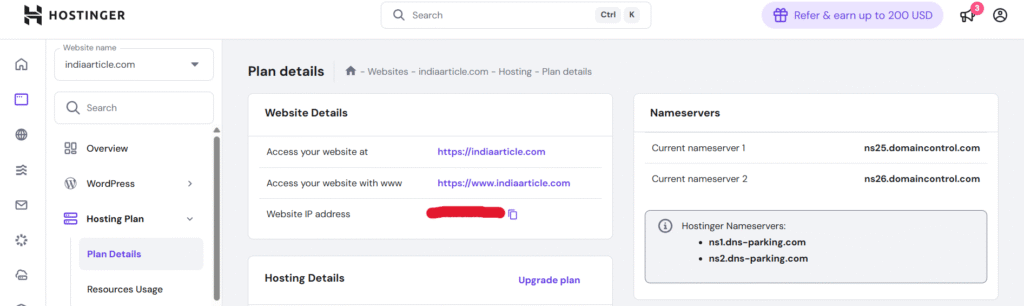
- On the left sidebar, click Hosting Plan.
- Under Plan Details, find the Website Details section.
- Copy the Website IP address — you’ll need this in the next steps!
Step 2 – Access Your Domain’s DNS Settings on GoDaddy
- Go to the GoDaddy website and log in to the account where your domain is registered.
- Once logged in, click on the Profile icon at the top right corner — it’s a circle with your initials or company name.
- From the dropdown, select My Products. Your page will refresh and show your domains.
- Scroll down to the All Products and Services section and find the domain you want to connect.
- Click on DNS next to your domain to open the DNS Management page.
Step 3 – Edit the A Record
- On the DNS Management page, click the DNS Records tab.
- Scroll down to find the records listed in the format: Type, Name, Data/Value, TTL.
- Look for the record with:
- Type – “A”
- Name – “@”
- Data/Value – “Parked”
- TTL – “600”
- Next to this record, click the pencil icon to edit it.
- Remove the existing Value – “Parked” and paste the Website IP address you copied earlier.
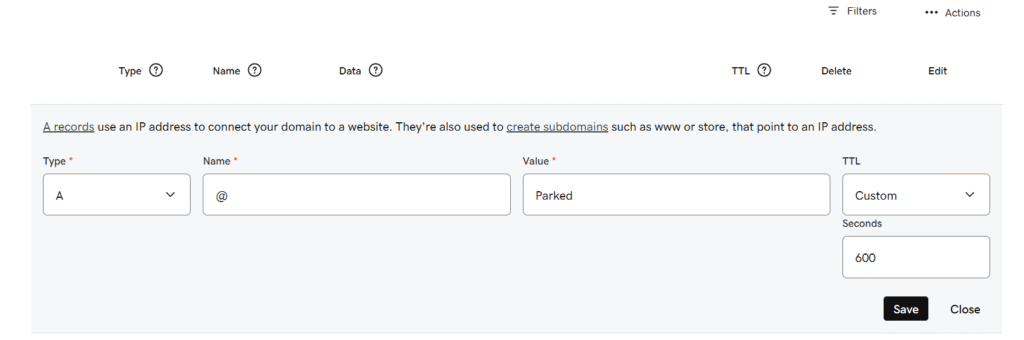
- Leave all other fields the same.
- Click Save to apply the changes.
Final Step – Done!
This method will take less time to establish the connection between your domain and the website server, helping you get your site live quickly and efficiently.
Adding MX Records if using Hostinger Email (Optional)
Since we’ve chosen the A records method, it’s important to note one key difference from the nameservers method. With A records, emails, subdomains, and verification settings cannot be managed directly through Hostinger like they are when you use nameservers. So, if you’re planning to use Hostinger’s custom email service with your domain, you’ll need to set up MX records in your GoDaddy account.
What are MX Records?
MX stands for Mail Exchange — these are the servers responsible for handling incoming emails for your domain. By adding the correct MX records, you’re telling the internet where to send emails addressed to your domain, making sure they reach the right destination!
How to Add MX Records on GoDaddy
Adding MX records is similar to how we edited the A record earlier. Here’s what you need to do:
- Log in to your GoDaddy account and go to your DNS Management page, just like we did when updating the A record.
- Scroll to the DNS Records section and click Add to create a new record.
- Add the first MX record:
- Type – “MX”
- Name – “@”
- Priority – “5”
- Value – “mx1.hostinger.com”
- TTL – “1/2 Hours” (or the closest option available)
- Add the second MX record:
- Type – “MX”
- Name – “@”
- Priority – “10”
- Value – “mx2.hostinger.com”
- TTL – “1/2 Hours”
Why This Matters
By adding these MX records, you’re telling email servers exactly where to deliver emails sent to your domain. This ensures that your messages arrive safely and on time. Without these records, you might face issues receiving emails through Hostinger’s mail servers.
With this step completed, your domain is now set up to handle emails through Hostinger, even when using the A records method. It’s a simple process but an essential one if you want your communications to run smoothly!
Verifying Your DNS Records – Is Everything Set?
After updating all the records, it’s important to make sure that the changes have fully propagated across the internet. This ensures that your domain is properly connected and ready to go live!
How to Check if Your DNS Records Are Propagated
- Visit https://dnschecker.org/.
- In the DNS Check section, enter your domain name.
- From the dropdown menu, choose:
- NS if you followed the Nameservers method
- A if you used Method 2 (A records).
- Click the search icon.
If you see a green checkmark next to the records, it means the changes have successfully propagated worldwide!
Final Step – Connect Your Domain in Hostinger
- Go to your Hostinger hPanel and open Website > Website List.
- Find the temporary domain you were using.
- Next to it, click on the three vertical dots ⋮ and select Connect Domain.
- You’ll be redirected to a new page — use the search bar to look for your custom domain.
- Once it appears, click on it and continue the process.
And that’s it! With this final step, your temporary domain will be fully connected to your new custom domain — giving your website a professional look that’s ready to impress.
Conclusion
Connecting your GoDaddy domain to your Hostinger website is easier than it sounds! Whether you choose the nameservers method for a hassle-free experience or the A records method for more control, both options help you build a professional online presence. By following this guide, you’re not only setting up your website but also learning how domains and servers work behind the scenes — a great step toward mastering your digital space.
Now that your domain is live, it’s time to showcase your portfolio, startup, or business to the world with confidence. Keep exploring, experimenting, and growing — your website journey has just begun!